
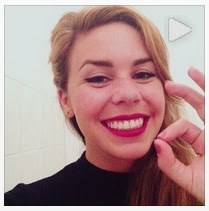
That's why, using products and tools you probably already have in your bathroom, I'm going to show you in seven simple steps to getting perfect, long-lasting, burgundy- colored lips. Ready to get in on the trend? Read on!
Click on the link with the steps to watch the Instagram- video's!
Step 1: Scrub

This first step to getting beautiful dark lips is also one of the most important. I don't care how moisturized you keep your lips on a daily basis- you need to buff them before you wear dark lipstick. You don't need any fancy products to slough it off.
Alternatively, you can use your toothbrush to gently brush away the dry skin on your lips. Or, if you're a real stickler for the rules, you can go out and buy an actual, honest-to-god lip scrub.
Step 2: Line

In the battle against lipstick bleeding (i.e. those tiny cracks around your lips that fill with color and make your lip line look all fuzzy), using liner is essential. That said, it can also be really scary. As someone who changes up her lipstick on the daily, it seems like overkill to buy a different color lipliner to every single lipstick.
This thing does wonders. Instead of lining the inside rim of your lips, you use it to trace the outside edge. You really can't mess this part up.
Step 3: Paint

Now, for the obvious part: filling in your lips. You may want to start by gently blotting the insides of your lips with a tissue to give the lipstick more of a surface to cling to.
For those of you who prefer a little more control, I recommend using a fairly stiff, narrow lip brush to paint it on. Since dark lipstick has a tendency to make lips look smaller, it's ok to exaggerate your natural lip line slightly- but oviously, don't go too far outside of the invisible liner you drew on before.
Step 4: Blot

This step is pretty important in terms of getting your lipstick to last as long as possible. After you've colored in your lips, use a tissue to gently blot the color you've applied. Don't do it too forcefully or you'll end up with little white things on your mouth. As Paris Hilton would've said like, 10 years ago, NOT HOT.
Step 5: Repaint

Yep, you're going to put your dark lipstick on all over again. I know, you're totally psyched. Do it exactly like you did before, but without blotting afterwards. And you're looking like a total beb already, amiright? Just one more tiny step to go...
Step 6: Conceal
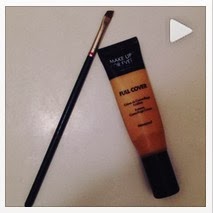
You can choose to forget this last step, but for dark lip beginners in particular, I wouldn't recommend it. Using a small, stiff brush, paint your concealer just around the outsides of your newly darkened lips to create a super clean border. This will give you even more of a barrier against the dreaded lip bleed. Blend the concealer outwards into your skin, taking extra care not to draw your lipstick out with it. Once you're satisfied with the results...
Step 7: Set
Lightly dust some powder or bronzer or whatever it is you're planning on dusting on your face anyway over your lips. Et voilà!
Thanks to fashionista.com
No comments:
Post a Comment